Docker Compose可以在Docker节点上,以单引擎模式进行多容器应用的部署和管理。使用时,首先定义多容器的应用的YAML文件,然后就可以交给docker-compose进行部署。
安装Docker Compose
直接访问Github的镜像源可能会超时,这样还有国内的镜像源可以使用,根据自己的需要修改版本号。
# 可能会超时
$ sudo curl -L https://github.com/docker/compose/releases/download/2.1.1/docker-compose-`uname -s`-`uname -m` -o /usr/local/bin/docker-compose

# 使用国内镜像源
$ sudo curl -L https://get.daocloud.io/docker/compose/releases/download/1.28.5/docker-compose-`uname -s`-`uname -m` -o /usr/local/bin/docker-compose

# 增加权限
$ sudo chmod +x /usr/local/bin/docker-compose

# 查看是否安装成功
$ docker-compose --version
docker-compose version 1.28.5, build c4eb3a1f
Compose文件
Docker Compose使用YAML文件定义多服务应用,YAML是JSON的子集,因此使用JSON也是可以的。文件的默认名是docker-compose.yml,也可使用-f参数指定具体的文件。
version: "3.5"

services:
  web-fe:
    build: .
    command: python app.py
    ports:
      - target: 5000
        published: 5000
    networks:
      - counter-net
    volumes:
      - type: volume
        source: counter-vol
        target: /code
  redis:
    image: "redis:alpine"
    networks:
      counter-net:

networks:
  counter-net:

volumes:
  counter-vol:
这个文件包含4个一级key:version, services, networks, volumes。
version:是必须指定的,而且总是位于文件的第一行。它定义的是使用的Compose文件格式的版本。services:用于定义不同的应用服务。就如上面的定义了两个服务,web-fe和redis。Docker Compose会将每个服务部署在各自的容器中。networks:用于指定Docker创建新网络,默认情况下创建bridge形式的网络。这是单主机类型网络,只能实现同一主机上容器的连接。volumes:指定创建新的卷。
根据networks和volumes会创建一个名为counter-net的网络和一个counter-vol的卷。services定义了两个二级key:web-fe和redis,因此会部署两个容器,这两个容器名字会使用这两个二级key。
在web-fe服务中:
build: .会基于当前目录,构建一个新的,用于启动容器的镜像,它会根据当前目录的Dockerfile构建镜像command: python app.py指定该脚本为主程序ports指定将容器内的- target的5000端口映射到主机published的5000端口上,也就是发送到主机5000端口的流量会被转发到Docker容器中的5000端口上networks使Docker可以连接到指定网络,这个网络应该是已经存在的或者是一级key中定义的网络volumes指定Docker将counter-vol卷(source:)挂载到容器内的/code(target:),这个卷是应该已经存在或者在一级key中定义了的
使用Docker Compose部署应用
示例的文件在这里下载。目录结构如下:
$ tree
.
├── app.py				# 应用程序代码 一个Flask应用
├── docker-compose.yml	# Compose文件,告诉Docker怎么部署应用
├── Dockerfile			# 定义如何构建web-fe镜像
├── README.md
└── requirements.txt	# python 所需的依赖
下面在这个目录把应用启起来:
这里需要注意的是,有些镜像源可能会拉去失败,我在更换了Docker的国内镜像源后就行了。
$ docker-compose up &
[1] 71363
$ Building web-fe
Sending build context to Docker daemon  6.656kB

Step 1/5 : FROM python:3.6-alpine
3.6-alpine: Pulling from library/python
a0d0a0d46f8b: Already exists
c11246b421be: Pulling fs layer
ef6741e6e9c4: Pulling fs layer
9d6fa827d5ce: Pulling fs layer
01b777f5b036: Pulling fs layer
01b777f5b036: Waiting
9d6fa827d5ce: Verifying Checksum
9d6fa827d5ce: Download complete
c11246b421be: Download complete
c11246b421be: Pull complete
01b777f5b036: Verifying Checksum
01b777f5b036: Download complete
ef6741e6e9c4: Verifying Checksum
ef6741e6e9c4: Download complete
ef6741e6e9c4: Pull complete
9d6fa827d5ce: Pull complete
01b777f5b036: Pull complete
Digest: sha256:4d04019f2907a6463e07c385ad30d773b122e83a32112d6cfc15902a12179da2
Status: Downloaded newer image for python:3.6-alpine
 ---> c5aebf5e06c5
Step 2/5 : ADD . /code
 ---> fea08c327ce0
Step 3/5 : WORKDIR /code
 ---> Running in 0a3784bffe75
Removing intermediate container 0a3784bffe75
 ---> 8ea8abf1588d
Step 4/5 : RUN pip install -r requirements.txt
 ---> Running in 1734648fa3fc
Collecting flask
  Downloading Flask-2.0.2-py3-none-any.whl (95 kB)
Collecting redis
  Downloading redis-3.5.3-py2.py3-none-any.whl (72 kB)
Collecting click>=7.1.2
  Downloading click-8.0.3-py3-none-any.whl (97 kB)
Collecting Werkzeug>=2.0
  Downloading Werkzeug-2.0.2-py3-none-any.whl (288 kB)
Collecting itsdangerous>=2.0
  Downloading itsdangerous-2.0.1-py3-none-any.whl (18 kB)
Collecting Jinja2>=3.0
  Downloading Jinja2-3.0.3-py3-none-any.whl (133 kB)
Collecting importlib-metadata
  Downloading importlib_metadata-4.8.2-py3-none-any.whl (17 kB)
Collecting MarkupSafe>=2.0
  Downloading MarkupSafe-2.0.1-cp36-cp36m-musllinux_1_1_x86_64.whl (29 kB)
Collecting dataclasses
  Downloading dataclasses-0.8-py3-none-any.whl (19 kB)
Collecting zipp>=0.5
  Downloading zipp-3.6.0-py3-none-any.whl (5.3 kB)
Collecting typing-extensions>=3.6.4
  Downloading typing_extensions-3.10.0.2-py3-none-any.whl (26 kB)
Installing collected packages: zipp, typing-extensions, MarkupSafe, importlib-metadata, dataclasses, Werkzeug, Jinja2, itsdangerous, click, redis, flask
WARNING: Running pip as the 'root' user can result in broken permissions and conflicting behaviour with the system package manager. It is recommended to use a virtual environment instead: https://pip.pypa.io/warnings/venv
Successfully installed Jinja2-3.0.3 MarkupSafe-2.0.1 Werkzeug-2.0.2 click-8.0.3 dataclasses-0.8 flask-2.0.2 importlib-metadata-4.8.2 itsdangerous-2.0.1 redis-3.5.3 typing-extensions-3.10.0.2 zipp-3.6.0
WARNING: You are using pip version 21.2.4; however, version 21.3.1 is available.
You should consider upgrading via the '/usr/local/bin/python -m pip install --upgrade pip' command.
Removing intermediate container 1734648fa3fc
 ---> f6d6d22ade59
Step 5/5 : CMD ["python", "app.py"]
 ---> Running in c11adb1eb784
Removing intermediate container c11adb1eb784
 ---> 1e3f0e452820
Successfully built 1e3f0e452820
Successfully tagged counter-app-master_web-fe:latest
WARNING: Image for service web-fe was built because it did not already exist. To rebuild this image you must use `docker-compose build` or `docker-compose up --build`.
Pulling redis (redis:alpine)...
alpine: Pulling from library/redis
a0d0a0d46f8b: Already exists
a04b0375051e: Pull complete
cdc2bb0f9590: Pull complete
0aa2a8e7bd65: Pull complete
f64034a16b58: Pull complete
7b9178a22893: Pull complete
Digest: sha256:58132ff3162cf9ecc8e2042c77b2ec46f6024c35e83bda3cabde76437406f8ac
Status: Downloaded newer image for redis:alpine
Creating counter-app-master_web-fe_1 ... done
Creating counter-app-master_redis_1  ... done
Attaching to counter-app-master_redis_1, counter-app-master_web-fe_1
redis_1   | 1:C 11 Nov 2021 08:10:29.159 # oO0OoO0OoO0Oo Redis is starting oO0OoO0OoO0Oo
redis_1   | 1:C 11 Nov 2021 08:10:29.159 # Redis version=6.2.6, bits=64, commit=00000000, modified=0, pid=1, just started
redis_1   | 1:C 11 Nov 2021 08:10:29.159 # Warning: no config file specified, using the default config. In order to specify a config file use redis-server /path/to/redis.conf
redis_1   | 1:M 11 Nov 2021 08:10:29.160 * monotonic clock: POSIX clock_gettime
redis_1   | 1:M 11 Nov 2021 08:10:29.161 * Running mode=standalone, port=6379.
redis_1   | 1:M 11 Nov 2021 08:10:29.161 # Server initialized
redis_1   | 1:M 11 Nov 2021 08:10:29.161 # WARNING overcommit_memory is set to 0! Background save may fail under low memory condition. To fix this issue add 'vm.overcommit_memory = 1' to /etc/sysctl.conf and then reboot or run the command 'sysctl vm.overcommit_memory=1' for this to take effect.
redis_1   | 1:M 11 Nov 2021 08:10:29.162 * Ready to accept connections
web-fe_1  |  * Serving Flask app 'app' (lazy loading)
web-fe_1  |  * Environment: production
web-fe_1  |    WARNING: This is a development server. Do not use it in a production deployment.
web-fe_1  |    Use a production WSGI server instead.
web-fe_1  |  * Debug mode: on
web-fe_1  |  * Running on all addresses.
web-fe_1  |    WARNING: This is a development server. Do not use it in a production deployment.
web-fe_1  |  * Running on http://172.18.0.2:5000/ (Press CTRL+C to quit)
web-fe_1  |  * Restarting with stat
lzl@lzl:~/WorkSpace/docker/counter-app-master$ web-fe_1  |  * Debugger is active!
web-fe_1  |  * Debugger PIN: 126-336-179
lzl@lzl:~/WorkSpace/docker/counter-app-master$
其启动流程如下:
- 首先会找到
Dockerfile,按照内容进行镜像构建。
   FROM python:3.6-alpine
   ADD . /code
   WORKDIR /code
   RUN pip install -r requirements.txt
   CMD ["python", "app.py"]
-
docker-compose up会查找名为docker-compose.yml或docker-compose.yaml的文件,按照文件学的进行多服务引用的构建。如果是其他的就需要用docker-compose -f xxx.yml up参数来启动。如果是docker-compose -f xxx.yml up -d这个-d命令使其在后台启动。 -
这样应用就构建并启动起来了。
   $ docker image ls
   REPOSITORY                           TAG          IMAGE ID       CREATED         SIZE
   counter-app-master_web-fe            latest       1e3f0e452820   5 minutes ago   52.5MB
   python                               3.6-alpine   c5aebf5e06c5   2 weeks ago     40.8MB
   redis                                alpine       e24d2b9deaec   5 weeks ago     32.3MB

   $ docker container ls
   CONTAINER ID   IMAGE                       COMMAND                  CREATED         STATUS         PORTS                                       NAMES
   93b990e9d382   counter-app-master_web-fe   "python app.py"          7 minutes ago   Up 7 minutes   0.0.0.0:5000->5000/tcp, :::5000->5000/tcp   counter-app-master_web-fe_1
   024d6af94218   redis:alpine                "docker-entrypoint.s…"   7 minutes ago   Up 7 minutes   6379/tcp                                    counter-app-master_redis_1

   $ docker network ls
   NETWORK ID     NAME                             DRIVER    SCOPE
   923f7682872b   bridge                           bridge    local
   66054169df04   counter-app-master_counter-net   bridge    local
   7a84b4fa35eb   host                             host      local
   66b37b687b76   none                             null      local

   $ docker volume ls
   DRIVER    VOLUME NAME
   local     4569b40ca4ad82b1c32612c1859721b8f3bafafa90455000520d7cb0c8764373
   local     counter-app-master_counter-vol
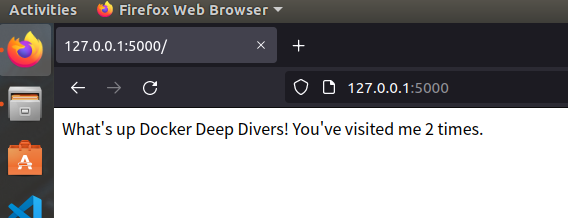
我们可以从中看到,新拉取的镜像,创建的容器以及网络和卷。然后打开我们的浏览器,访问5000端口。

- 此外,因为我们在启动时使用了
&,这会将所有日志输出到终端。
   web-fe_1  | 172.18.0.1 - - [11/Nov/2021 08:22:42] "GET / HTTP/1.1" 200 -
   web-fe_1  | 172.18.0.1 - - [11/Nov/2021 08:22:42] "GET /favicon.ico HTTP/1.1" 404 -
   web-fe_1  | 172.18.0.1 - - [11/Nov/2021 08:22:48] "GET / HTTP/1.1" 200 -
- 这样,我们就通过docker compose文件成功部署了两个服务(容器)的应用。
使用Docker Compose管理应用
关闭服务的命令很简单,但实际上down使用了两个命令,分别是stop和rm:
$ docker-compose down
Stopping counter-app-master_redis_1  ...
Stopping counter-app-master_web-fe_1 ...
redis_1   | 1:signal-handler (1636619854) Received SIGTERM scheduling shutdown...
redis_1   | 1:M 11 Nov 2021 08:37:34.813 # User requested shutdown...
redis_1   | 1:M 11 Nov 2021 08:37:34.813 * Saving the final RDB snapshot before exiting.
Stopping counter-app-master_redis_1  ... done
redis_1   | 1:M 11 Nov 2021 08:37:34.815 # Redis is now ready to exit, bye bye...
Stopping counter-app-master_web-fe_1 ... done
counter-app-master_web-fe_1 exited with code 0
Removing counter-app-master_redis_1  ... done
Removing counter-app-master_web-fe_1 ... done
Removing network counter-app-master_counter-net
[1]+  Done                    docker-compose up
- 首先,尝试停止两个服务。
- 向服务发送
SIGTERM优雅关闭服务。 - 我们发现在退出之前会保存卷数据,这个卷保证数据持久化存储,卷的生命周期和容器的是解耦的。
在后台启动:
$ docker-compose up -d
Creating network "counter-app-master_counter-net" with the default driver
Creating counter-app-master_web-fe_1 ... done
Creating counter-app-master_redis_1  ... done
查看已经启动的服务:
$ docker-compose ps
           Name                          Command               State                    Ports
---------------------------------------------------------------------------------------------------------------
counter-app-master_redis_1    docker-entrypoint.sh redis ...   Up      6379/tcp
counter-app-master_web-fe_1   python app.py                    Up      0.0.0.0:5000->5000/tcp,:::5000->5000/tcp
查看每个服务中的进程:
$ docker-compose top
counter-app-master_redis_1
UID    PID    PPID    C   STIME   TTY     TIME             CMD
----------------------------------------------------------------------
999   73540   73474   0   16:42   ?     00:00:00   redis-server *:6379

counter-app-master_web-fe_1
UID     PID    PPID    C   STIME   TTY     TIME                    CMD
--------------------------------------------------------------------------------------
root   73576   73519   2   16:42   ?     00:00:00   python app.py
root   73706   73576   2   16:42   ?     00:00:00   /usr/local/bin/python /code/app.py
与关闭服务的down不同,stop是暂停服务,在列表中仍然可以看到:
$ docker-compose stop
Stopping counter-app-master_web-fe_1 ... done
Stopping counter-app-master_redis_1  ... done
$ docker-compose ps
           Name                          Command               State    Ports
-----------------------------------------------------------------------------
counter-app-master_redis_1    docker-entrypoint.sh redis ...   Exit 0
counter-app-master_web-fe_1   python app.py                    Exit 0
进一步,使用rm会删除Compose应用,但是不会删除镜像和卷:
$ docker-compose rm
Going to remove counter-app-master_web-fe_1, counter-app-master_redis_1
Are you sure? [yN] y
Removing counter-app-master_web-fe_1 ... done
Removing counter-app-master_redis_1  ... done
$ docker-compose ps
Name   Command   State   Ports
已经rm的应用是不能通过restart命令重启的,而stop的可以通过restart重启
$ docker-compose rm
Going to remove counter-app-master_web-fe_1, counter-app-master_redis_1
Are you sure? [yN] y
Removing counter-app-master_web-fe_1 ... done
Removing counter-app-master_redis_1  ... done
$ docker-compose restart
ERROR: No containers to restart
ERROR: 1

$ docker-compose stop
Stopping counter-app-master_redis_1  ... done
Stopping counter-app-master_web-fe_1 ... done
$ docker-compose restart
Restarting counter-app-master_redis_1  ... done
Restarting counter-app-master_web-fe_1 ... done
应用使用卷volume进行持久化存储
在上面的实例中,我们先看Dockerfile文件:
FROM python:3.6-alpine
ADD . /code
WORKDIR /code
RUN pip install -r requirements.txt
CMD ["python", "app.py"]
我们将主机上的项目根目录中的文件拷贝到容器中的/code目录下,并设为工作目录。
然后在docker-compose.yml文件中:
version: "3.5"

services:
  web-fe:
    build: .
    command: python app.py
    ports:
      - target: 5000
        published: 5000
    networks:
      - counter-net
    volumes:
      - type: volume
        source: counter-vol
        target: /code
  redis:
    image: "redis:alpine"
    networks:
      counter-net:

networks:
  counter-net:

volumes:
  counter-vol:
我们把用于数据存储的卷counter-vol挂载到/code目录下,也就是target: /code。在使用docker-compose up第一次启动应用时,会查找是否指定的卷已经存在,如果没有就按照一级key指定的创建,并进行挂载。
使用down是不会删除卷的,所以在第二次启动时,速度会快很多,因为指定的卷已经存在了。
这同样说明,在Docker主机中对卷中的数据进行修改,会反映到容器中,我们来验证下。(此时应用是运行中的)
-
编辑
app.py文件,显示不同的内容。我们加一个"A New Change!"。 -
然后将更新的文件复制到Docker主机相应的卷中,也就是复制到一个或者多个容器的挂载点上。使用如下命令查看容器在主机的挂载点:
   $ docker volume inspect counter-app-master_counter-vol
   [
       {
           "CreatedAt": "2021-11-11T16:10:28+08:00",
           "Driver": "local",
           "Labels": {
               "com.docker.compose.project": "counter-app-master",
               "com.docker.compose.version": "1.28.5",
               "com.docker.compose.volume": "counter-vol"
           },
           "Mountpoint": "/var/lib/docker/volumes/counter-app-master_counter-vol/_data",
           "Name": "counter-app-master_counter-vol",
           "Options": null,
           "Scope": "local"
       }
   ]
"Mountpoint": "/var/lib/docker/volumes/counter-app-master_counter-vol/_data"就是。然后进行复制。
$ sudo cp app.py /var/lib/docker/volumes/counter-app-master_counter-vol/_data/app.py
-
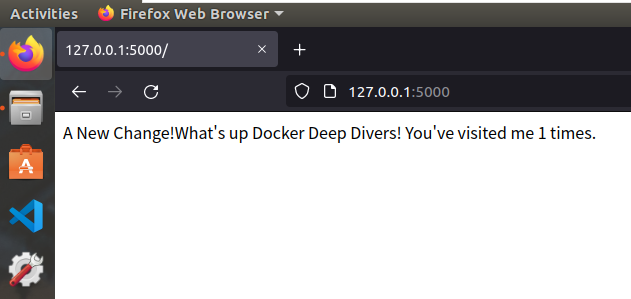
我们刷新下页面:

已经变了,说明是起作用的。