本节的目标是:搭建含有一个Master Node和两个Work Node的k8s集群,创建一个admin用户并通过token访问kubernetes dashboard。
具体步骤如下。
- 启动k8主节点
- 将两个work节点加入集群
- 安装dashboard组件
- 创建集群管理员用户
- 获取token并登入dashboard
启动Master Node
启动主节点
该部分参照第一节启动k8s的主节点(k8s实践-1) - Big Carrot (lizonglin313.github.io),将集群的主节点启动。
root@lzl:/home/lzl# kubeadm init --kubernetes-version=v1.22.4 --pod-network-cidr=10.5.0.0/16 --ignore-preflight-errors=Swap
[init] Using Kubernetes version: v1.22.4
[preflight] Running pre-flight checks
[preflight] Pulling images required for setting up a Kubernetes cluster
[preflight] This might take a minute or two, depending on the speed of your internet connection
[preflight] You can also perform this action in beforehand using 'kubeadm config images pull'
[certs] Using certificateDir folder "/etc/kubernetes/pki"
[certs] Generating "ca" certificate and key
[certs] Generating "apiserver" certificate and key
[certs] apiserver serving cert is signed for DNS names [kubernetes kubernetes.default kubernetes.default.svc kubernetes.default.svc.cluster.local lzl] and IPs [10.96.0.1 192.168.230.11]
[certs] Generating "apiserver-kubelet-client" certificate and key
[certs] Generating "front-proxy-ca" certificate and key
[certs] Generating "front-proxy-client" certificate and key
[certs] Generating "etcd/ca" certificate and key
[certs] Generating "etcd/server" certificate and key
[certs] etcd/server serving cert is signed for DNS names [localhost lzl] and IPs [192.168.230.11 127.0.0.1 ::1]
[certs] Generating "etcd/peer" certificate and key
[certs] etcd/peer serving cert is signed for DNS names [localhost lzl] and IPs [192.168.230.11 127.0.0.1 ::1]
[certs] Generating "etcd/healthcheck-client" certificate and key
[certs] Generating "apiserver-etcd-client" certificate and key
[certs] Generating "sa" key and public key
[kubeconfig] Using kubeconfig folder "/etc/kubernetes"
[kubeconfig] Writing "admin.conf" kubeconfig file
[kubeconfig] Writing "kubelet.conf" kubeconfig file
[kubeconfig] Writing "controller-manager.conf" kubeconfig file
[kubeconfig] Writing "scheduler.conf" kubeconfig file
[kubelet-start] Writing kubelet environment file with flags to file "/var/lib/kubelet/kubeadm-flags.env"
[kubelet-start] Writing kubelet configuration to file "/var/lib/kubelet/config.yaml"
[kubelet-start] Starting the kubelet
[control-plane] Using manifest folder "/etc/kubernetes/manifests"
[control-plane] Creating static Pod manifest for "kube-apiserver"
[control-plane] Creating static Pod manifest for "kube-controller-manager"
[control-plane] Creating static Pod manifest for "kube-scheduler"
[etcd] Creating static Pod manifest for local etcd in "/etc/kubernetes/manifests"
[wait-control-plane] Waiting for the kubelet to boot up the control plane as static Pods from directory "/etc/kubernetes/manifests". This can take up to 4m0s
[apiclient] All control plane components are healthy after 14.007476 seconds
[upload-config] Storing the configuration used in ConfigMap "kubeadm-config" in the "kube-system" Namespace
[kubelet] Creating a ConfigMap "kubelet-config-1.22" in namespace kube-system with the configuration for the kubelets in the cluster
[upload-certs] Skipping phase. Please see --upload-certs
[mark-control-plane] Marking the node lzl as control-plane by adding the labels: [node-role.kubernetes.io/master(deprecated) node-role.kubernetes.io/control-plane node.kubernetes.io/exclude-from-external-load-balancers]
[mark-control-plane] Marking the node lzl as control-plane by adding the taints [node-role.kubernetes.io/master:NoSchedule]
[bootstrap-token] Using token: 1la5tc.rbk7kyfx0g8cvj2n
[bootstrap-token] Configuring bootstrap tokens, cluster-info ConfigMap, RBAC Roles
[bootstrap-token] configured RBAC rules to allow Node Bootstrap tokens to get nodes
[bootstrap-token] configured RBAC rules to allow Node Bootstrap tokens to post CSRs in order for nodes to get long term certificate credentials
[bootstrap-token] configured RBAC rules to allow the csrapprover controller automatically approve CSRs from a Node Bootstrap Token
[bootstrap-token] configured RBAC rules to allow certificate rotation for all node client certificates in the cluster
[bootstrap-token] Creating the "cluster-info" ConfigMap in the "kube-public" namespace
[kubelet-finalize] Updating "/etc/kubernetes/kubelet.conf" to point to a rotatable kubelet client certificate and key
[addons] Applied essential addon: CoreDNS
[addons] Applied essential addon: kube-proxy

Your Kubernetes control-plane has initialized successfully!

To start using your cluster, you need to run the following as a regular user:

  mkdir -p $HOME/.kube
  sudo cp -i /etc/kubernetes/admin.conf $HOME/.kube/config
  sudo chown $(id -u):$(id -g) $HOME/.kube/config

Alternatively, if you are the root user, you can run:

  export KUBECONFIG=/etc/kubernetes/admin.conf

You should now deploy a pod network to the cluster.
Run "kubectl apply -f [podnetwork].yaml" with one of the options listed at:
  https://kubernetes.io/docs/concepts/cluster-administration/addons/

Then you can join any number of worker nodes by running the following on each as root:

kubeadm join 192.168.230.11:6443 --token 1la5tc.rbk7kyfx0g8cvj2n \
	--discovery-token-ca-cert-hash sha256:4ba0f32696c7c776a99e7e7afc3f51035d6895b786733eacd27e9cb993567f68

root@lzl:/home/lzl# export KUBECONFIG=/etc/kubernetes/admin.conf
配置集群网络
这里我们使用flannel网络组件作为集群网络。
root@lzl:/home/lzl# kubectl apply -f https://raw.githubusercontent.com/coreos/flannel/master/Documentation/kube-flannel.yml
Warning: policy/v1beta1 PodSecurityPolicy is deprecated in v1.21+, unavailable in v1.25+
podsecuritypolicy.policy/psp.flannel.unprivileged created
clusterrole.rbac.authorization.k8s.io/flannel created
clusterrolebinding.rbac.authorization.k8s.io/flannel created
serviceaccount/flannel created
configmap/kube-flannel-cfg created
daemonset.apps/kube-flannel-ds created

root@lzl:/home/lzl# kubectl get componentstatus
Warning: v1 ComponentStatus is deprecated in v1.19+
NAME                 STATUS      MESSAGE                                                                                       ERROR
scheduler            Unhealthy   Get "http://127.0.0.1:10251/healthz": dial tcp 127.0.0.1:10251: connect: connection refused
controller-manager   Healthy     ok
etcd-0               Healthy     {"health":"true","reason":""}
查看集群组件状态,发现主节点的scheduler不正常。根据上一个教程,修改scheduler和controller的配置文件中的端口号。
root@lzl:/etc/kubernetes/manifests# kubectl get componentstatus
Warning: v1 ComponentStatus is deprecated in v1.19+
NAME                 STATUS    MESSAGE                         ERROR
scheduler            Healthy   ok
controller-manager   Healthy   ok
etcd-0               Healthy   {"health":"true","reason":""}

root@lzl:/home/lzl# kubectl get nodes
NAME   STATUS   ROLES                  AGE   VERSION
lzl    Ready    control-plane,master   12m   v1.22.4
这样三个组件状态正常,主节点启动成功,下面安装Dashboard。
安装Kubernetes Dashboard
root@lzl:/home/lzl# kubectl apply -f https://raw.githubusercontent.com/kubernetes/dashboard/v2.2.0/aio/deploy/recommended.yaml
namespace/kubernetes-dashboard created
serviceaccount/kubernetes-dashboard created
service/kubernetes-dashboard created
secret/kubernetes-dashboard-certs created
secret/kubernetes-dashboard-csrf created
secret/kubernetes-dashboard-key-holder created
configmap/kubernetes-dashboard-settings created
role.rbac.authorization.k8s.io/kubernetes-dashboard created
clusterrole.rbac.authorization.k8s.io/kubernetes-dashboard created
rolebinding.rbac.authorization.k8s.io/kubernetes-dashboard created
clusterrolebinding.rbac.authorization.k8s.io/kubernetes-dashboard created
deployment.apps/kubernetes-dashboard created
service/dashboard-metrics-scraper created
Warning: spec.template.metadata.annotations[seccomp.security.alpha.kubernetes.io/pod]: deprecated since v1.19; use the "seccompProfile" field instead
deployment.apps/dashboard-metrics-scraper created
查看是否能够启动Dashboard,这里使用kubectl proxy命令启动代理服务,然后访问http://localhost:8001/api/v1/namespaces/kubernetes-dashboard/services/https:kubernetes-dashboard:/proxy/。
root@lzl:/home/lzl# kubectl proxy
Starting to serve on 127.0.0.1:8001
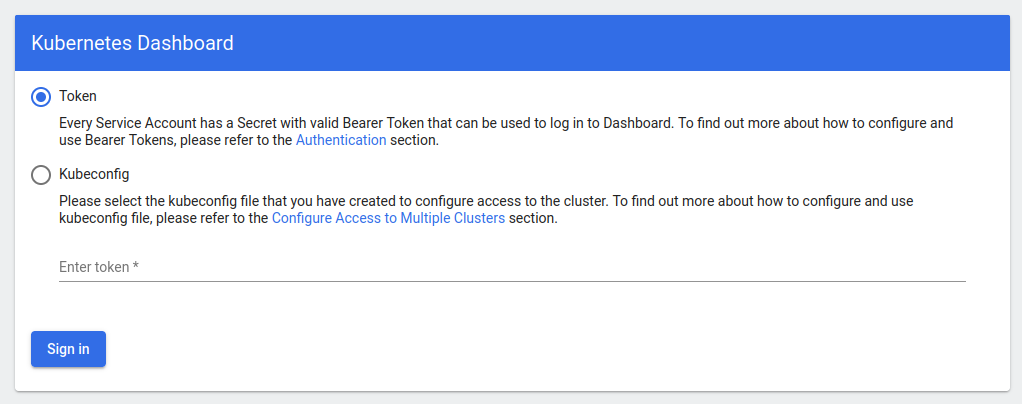
出现此界面说明Dashboard安装成功并可以启动。
将Work Node加入集群
工作节点的加入,在工作节点使用启动主节点是给出的命令就可。
...
Then you can join any number of worker nodes by running the following on each as root:

kubeadm join 192.168.230.11:6443 --token 1la5tc.rbk7kyfx0g8cvj2n \
	--discovery-token-ca-cert-hash sha256:4ba0f32696c7c776a99e7e7afc3f51035d6895b786733eacd27e9cb993567f68
...
我的两个工作节点的IP分别为:192.168.230.12和192.168.230.13。
在加入工作节点时 出现了如下错误:
root@lzl-b:/home/lzl# kubeadm join 192.168.230.11:6443 --token 1la5tc.rbk7kyfx0g8cvj2n --discovery-token-ca-cert-hash sha256:4ba0f32696c7c776a99e7e7afc3f51035d6895b786733eacd27e9cb993567f68
[preflight] Running pre-flight checks
[preflight] Reading configuration from the cluster...
[preflight] FYI: You can look at this config file with 'kubectl -n kube-system get cm kubeadm-config -o yaml'
[kubelet-start] Writing kubelet configuration to file "/var/lib/kubelet/config.yaml"
[kubelet-start] Writing kubelet environment file with flags to file "/var/lib/kubelet/kubeadm-flags.env"
[kubelet-start] Starting the kubelet
[kubelet-start] Waiting for the kubelet to perform the TLS Bootstrap...
[kubelet-check] Initial timeout of 40s passed.
[kubelet-check] It seems like the kubelet isn't running or healthy.
[kubelet-check] The HTTP call equal to 'curl -sSL http://localhost:10248/healthz' failed with error: Get "http://localhost:10248/healthz": dial tcp 127.0.0.1:10248: connect: connection refused.
[kubelet-check] It seems like the kubelet isn't running or healthy.
[kubelet-check] The HTTP call equal to 'curl -sSL http://localhost:10248/healthz' failed with error: Get "http://localhost:10248/healthz": dial tcp 127.0.0.1:10248: connect: connection refused.
[kubelet-check] It seems like the kubelet isn't running or healthy.
[kubelet-check] The HTTP call equal to 'curl -sSL http://localhost:10248/healthz' failed with error: Get "http://localhost:10248/healthz": dial tcp 127.0.0.1:10248: connect: connection refused.
[kubelet-check] It seems like the kubelet isn't running or healthy.
[kubelet-check] The HTTP call equal to 'curl -sSL http://localhost:10248/healthz' failed with error: Get "http://localhost:10248/healthz": dial tcp 127.0.0.1:10248: connect: connection refused.
[kubelet-check] It seems like the kubelet isn't running or healthy.
[kubelet-check] The HTTP call equal to 'curl -sSL http://localhost:10248/healthz' failed with error: Get "http://localhost:10248/healthz": dial tcp 127.0.0.1:10248: connect: connection refused.
error execution phase kubelet-start: error uploading crisocket: timed out waiting for the condition
To see the stack trace of this error execute with --v=5 or higher
然后进行排错,出错原因可能有以下:
- 有说是因为docker的cgroup驱动设置的问题:https://blog.csdn.net/imonkeyi/article/details/120452471
- 没有关闭主机swap也会产生问题
按照我上一篇的文章的前置环境和上述博文进行设置,关闭swap分区并设置docker的cgroup驱动,成功解决,直接使用k8s master节点的给出的提示命令就可以将work节点加入集群。
所以需要注意,工作节点加入集群的前置条件是(可能不完整):
- 必须需安装kubelet、kubeadm
- 关闭swap分区
- 设置好docker的cgroup驱动
然后使用kubeadm reset将环境重置,重新将工作节点加入集群。
root@lzl-b:/home/lzl# kubeadm reset
[reset] WARNING: Changes made to this host by 'kubeadm init' or 'kubeadm join' will be reverted.
[reset] Are you sure you want to proceed? [y/N]: y
[preflight] Running pre-flight checks
W0117 19:06:49.180263   37850 removeetcdmember.go:80] [reset] No kubeadm config, using etcd pod spec to get data directory
[reset] No etcd config found. Assuming external etcd
[reset] Please, manually reset etcd to prevent further issues
[reset] Stopping the kubelet service
[reset] Unmounting mounted directories in "/var/lib/kubelet"
[reset] Deleting contents of config directories: [/etc/kubernetes/manifests /etc/kubernetes/pki]
[reset] Deleting files: [/etc/kubernetes/admin.conf /etc/kubernetes/kubelet.conf /etc/kubernetes/bootstrap-kubelet.conf /etc/kubernetes/controller-manager.conf /etc/kubernetes/scheduler.conf]
[reset] Deleting contents of stateful directories: [/var/lib/kubelet /var/lib/dockershim /var/run/kubernetes /var/lib/cni]

The reset process does not clean CNI configuration. To do so, you must remove /etc/cni/net.d

The reset process does not reset or clean up iptables rules or IPVS tables.
If you wish to reset iptables, you must do so manually by using the "iptables" command.

If your cluster was setup to utilize IPVS, run ipvsadm --clear (or similar)
to reset your system's IPVS tables.

The reset process does not clean your kubeconfig files and you must remove them manually.
Please, check the contents of the $HOME/.kube/config file.
root@lzl-b:/home/lzl# kubeadm join 192.168.230.11:6443 --token 1la5tc.rbk7kyfx0g8cvj2n --discovery-token-ca-cert-hash sha256:4ba0f32696c7c776a99e7e7afc3f51035d6895b786733eacd27e9cb993567f68
[preflight] Running pre-flight checks
[preflight] Reading configuration from the cluster...
[preflight] FYI: You can look at this config file with 'kubectl -n kube-system get cm kubeadm-config -o yaml'
[kubelet-start] Writing kubelet configuration to file "/var/lib/kubelet/config.yaml"
[kubelet-start] Writing kubelet environment file with flags to file "/var/lib/kubelet/kubeadm-flags.env"
[kubelet-start] Starting the kubelet
[kubelet-start] Waiting for the kubelet to perform the TLS Bootstrap...

This node has joined the cluster:
* Certificate signing request was sent to apiserver and a response was received.
* The Kubelet was informed of the new secure connection details.

Run 'kubectl get nodes' on the control-plane to see this node join the cluster.
依次加入两个工作节点lzl-b和lzl-c,然后在主节点查看集群节点信息:
root@lzl:/home/lzl# kubectl get nodes
NAME    STATUS   ROLES                  AGE    VERSION
lzl     Ready    control-plane,master   110m   v1.22.4
lzl-b   Ready    <none>                 21m    v1.22.4
lzl-c   Ready    <none>                 10m    v1.22.4
然后验证整个集群的工作状态:
root@lzl:/home/lzl# kubectl get pods --all-namespaces
NAMESPACE              NAME                                         READY   STATUS    RESTARTS   AGE
kube-system            coredns-78fcd69978-7fspq                     1/1     Running   0          110m
kube-system            coredns-78fcd69978-7vffp                     1/1     Running   0          110m
kube-system            etcd-lzl                                     1/1     Running   0          111m
kube-system            kube-apiserver-lzl                           1/1     Running   0          111m
kube-system            kube-controller-manager-lzl                  1/1     Running   0          100m
kube-system            kube-flannel-ds-mjxd8                        1/1     Running   0          105m
kube-system            kube-flannel-ds-r7s7c                        1/1     Running   0          11m
kube-system            kube-flannel-ds-wjsz4                        1/1     Running   0          22m
kube-system            kube-proxy-4n6xk                             1/1     Running   0          11m
kube-system            kube-proxy-w7vl7                             1/1     Running   0          22m
kube-system            kube-proxy-xw6c9                             1/1     Running   0          110m
kube-system            kube-scheduler-lzl                           1/1     Running   0          101m
kubernetes-dashboard   dashboard-metrics-scraper-856586f554-2snbz   1/1     Running   0          94m
kubernetes-dashboard   kubernetes-dashboard-78c79f97b4-j6k9r        1/1     Running   0          94m
至此就使用kubeadm成功搭建了一个主节点和两个工作节点的集群,如果安装失败可以使用kubeadm reset命令将主机恢复,然后重新安装。
配置Kubernetes Dashboard
如果想在k8s中使用Dashboard对集群状态进行监控等操作,需要创建用户,这里结合以下三个示例:
-
https://github.com/kubernetes/dashboard/blob/master/docs/user/access-control/creating-sample-user.md
-
https://jimmysong.io/kubernetes-handbook/guide/auth-with-kubeconfig-or-token.html
创建用户角色的文件如下,创建一个ServiceAccount然后将该账户绑定到cluster权限上。
apiVersion: v1
kind: ServiceAccount
metadata:
  name: admin-user
  namespace: kubernetes-dashboard
---
apiVersion: rbac.authorization.k8s.io/v1
kind: ClusterRoleBinding
metadata:
  name: admin-user
roleRef:
  # "roleRef" 指定与某 Role 或 ClusterRole 的绑定关系
  apiGroup: rbac.authorization.k8s.io
  kind: ClusterRole  # 此字段必须是 Role 或 ClusterRole
  name: cluster-admin  # 此字段必须与你要绑定的 Role 或 ClusterRole 的名称匹配
subjects:
- kind: ServiceAccount
  name: admin-user
  namespace: kubernetes-dashboard
下面创建用户并获取用户的token,进行dashboard的登录。
root@lzl:/home/lzl# kubectl create -f admin-role.yaml
serviceaccount/admin-user created
clusterrolebinding.rbac.authorization.k8s.io/admin-user created

root@lzl:/home/lzl# kubectl -n kubernetes-dashboard get secret $(kubectl -n kubernetes-dashboard get sa/admin-user -o jsonpath="{.secrets[0].name}") -o go-template="{{.data.token | base64decode}}"
eyJhbGciOiJSUzI1NiIsImtpZCI6Ild5MHVweWVackR5b1RYcUFKLWgwUlBKTG9UVFM3U2pIMWYzRFJ1Mi1kUm8ifQ.eyJpc3MiOiJrdWJlcm5ldGVzL3NlcnZpY2VhY2NvdW50Iiwia3ViZXJuZXRlcy5pby9zZXJ2aWNlYWNjb3VudC9uYW1lc3BhY2UiOiJrdWJlcm5ldGVzLWRhc2hib2FyZCIsImt1YmVybmV0ZXMuaW8vc2VydmljZWFjY291bnQvc2VjcmV0Lm5hbWUiOiJhZG1pbi11c2VyLXRva2VuLWprMjhoIiwia3ViZXJuZXRlcy5pby9zZXJ2aWNlYWNjb3VudC9zZXJ2aWNlLWFjY291bnQubmFtZSI6ImFkbWluLXVzZXIiLCJrdWJlcm5ldGVzLmlvL3NlcnZpY2VhY2NvdW50L3NlcnZpY2UtYWNjb3VudC51aWQiOiJjN2Y0NzkwZC03YWZlLTRiYWUtOWI0OC0wOTFkZTE4ZjVhYTYiLCJzdWIiOiJzeXN0ZW06c2VydmljZWFjY291bnQ6a3ViZXJuZXRlcy1kYXNoYm9hcmQ6YWRtaW4tdXNlciJ9.fmSCJRpiFCqu36umiT7GFXH3WvNE3O3cLmbrwaljYsI48JZXk35tzr10HPWRNBts9vHaoQOaZxGbWeUvxa51QQNlJEAt0b5fdIahCr9myYTSJZHCUNaS3nftvROv0XIHcLZvLGgJngguChrcOO5XK7-7i1hawBf_d3Xesga-uWS0NYxZR5Fsv_Ponipet4Hkr329EjFs3JD0yTMJEnEpwLnDJioz4KkmPdpE2rZBj65Sc6UxOjZrY3kdSMITj8nWMdKetfm8zbvkt3yxKi88FzBfNOUeUMFxywf4cUiWw-z7v9_pSU6xjkK7-P_9LxiaDHW0ZrfYoXEPf6oLVpR1EQ

root@lzl:/home/lzl# kubectl proxy
Starting to serve on 127.0.0.1:8001
再次打开dashboard界面,输入token登录。
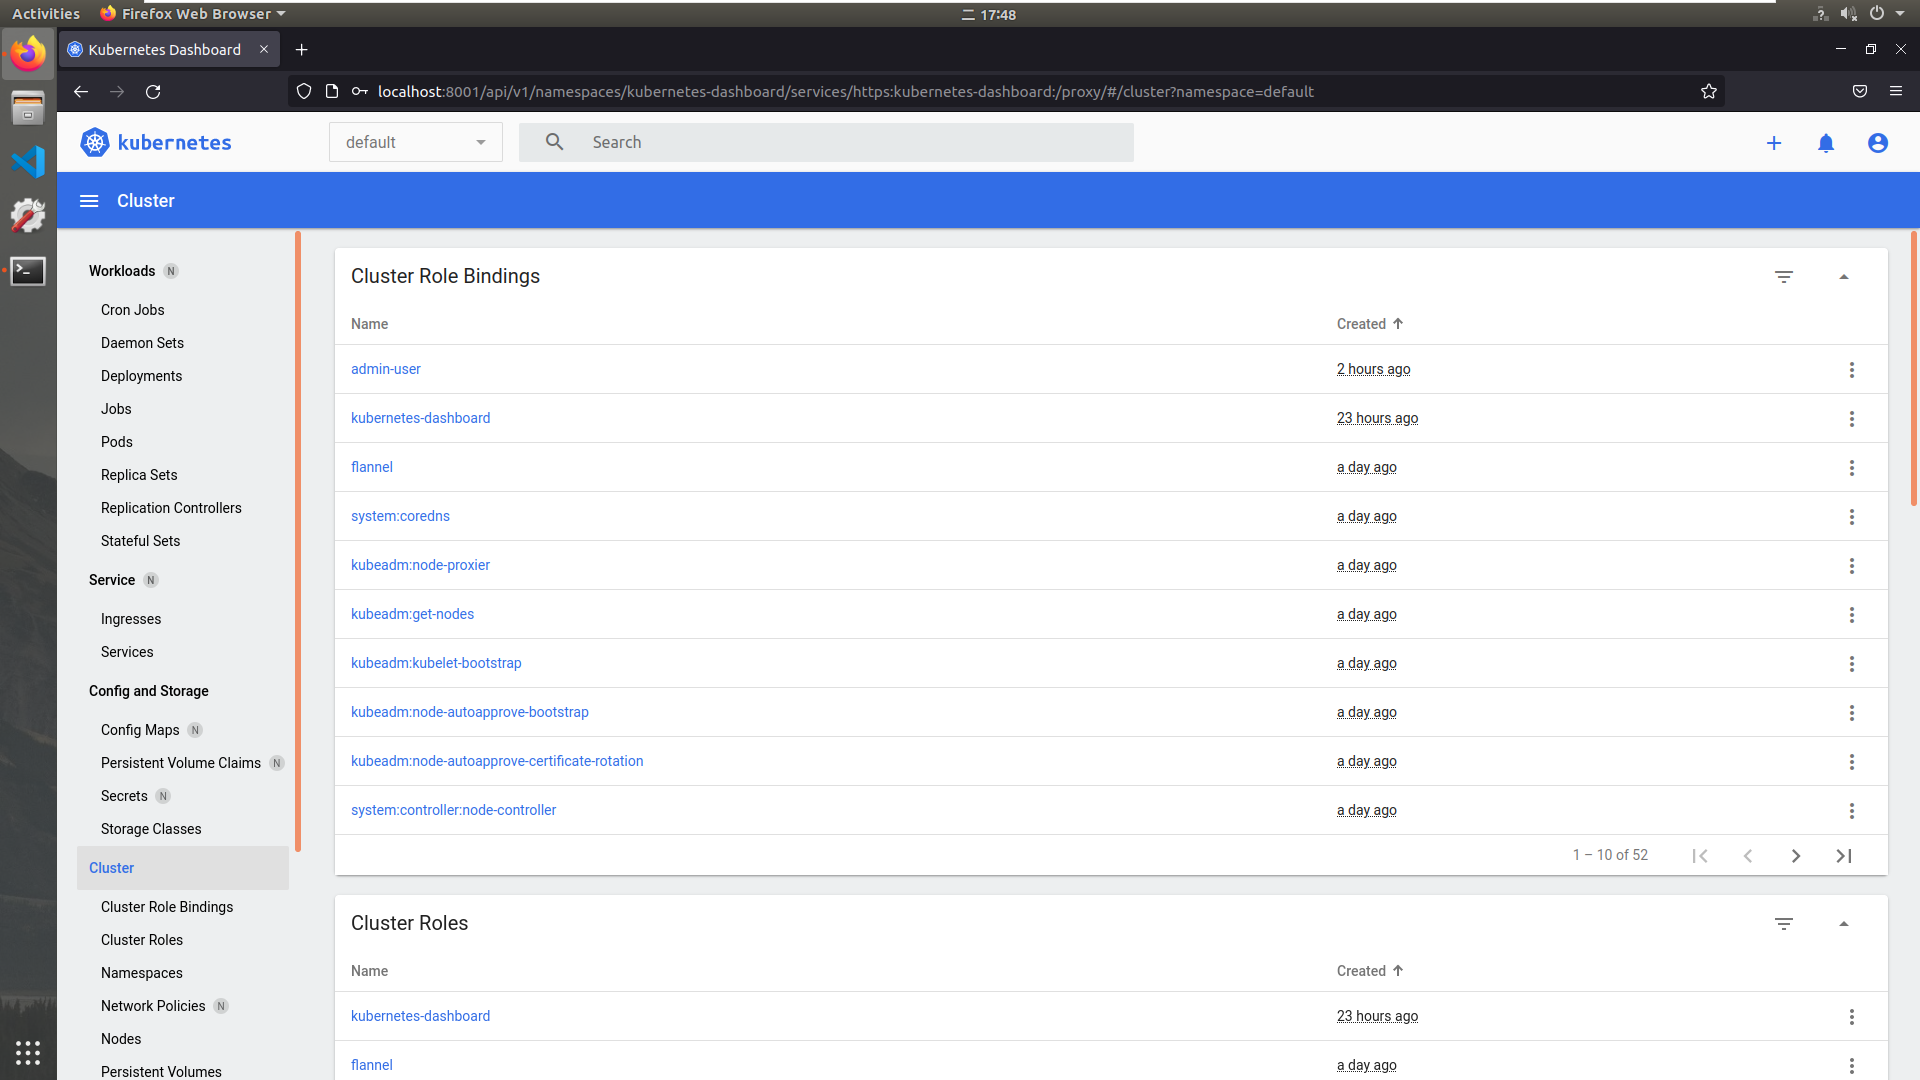
已经有正常的资源信息显示了。
至此,我们已经搭建了包含一个master节点和两个work节点的k8s集群,并且可以通过创建的角色访问dashboard来管理集群资源了。