
今天在复习之前的项目时,看到这个知识点觉得还是有必要记录一下的,因为:
- 平时自己看官方文档或者写 Web 方面的 Demo 项目,很少会去专门考虑身份验证这个问题。一般写着玩的 API 都不会太重视安全问题,难得复习到这一点。
- JWT Token 在 Web 中是一种常见的身份验证方式,也是 Web 开发中安全相关的重要知识。
本文所分享的使用 gRPC 拦截器和 Context 的使用场景是:解析 Token 并带着用户信息取执行各个请求。
本文从以下三个步骤展开分享:
- 通过用户 ID 生成 Token
- 验证 Token 得到用户 ID
- 通过 gRPC 拦截器和 Context 把 Token 验证转为公共的逻辑
JWT Token原理
JWT 的一些概念
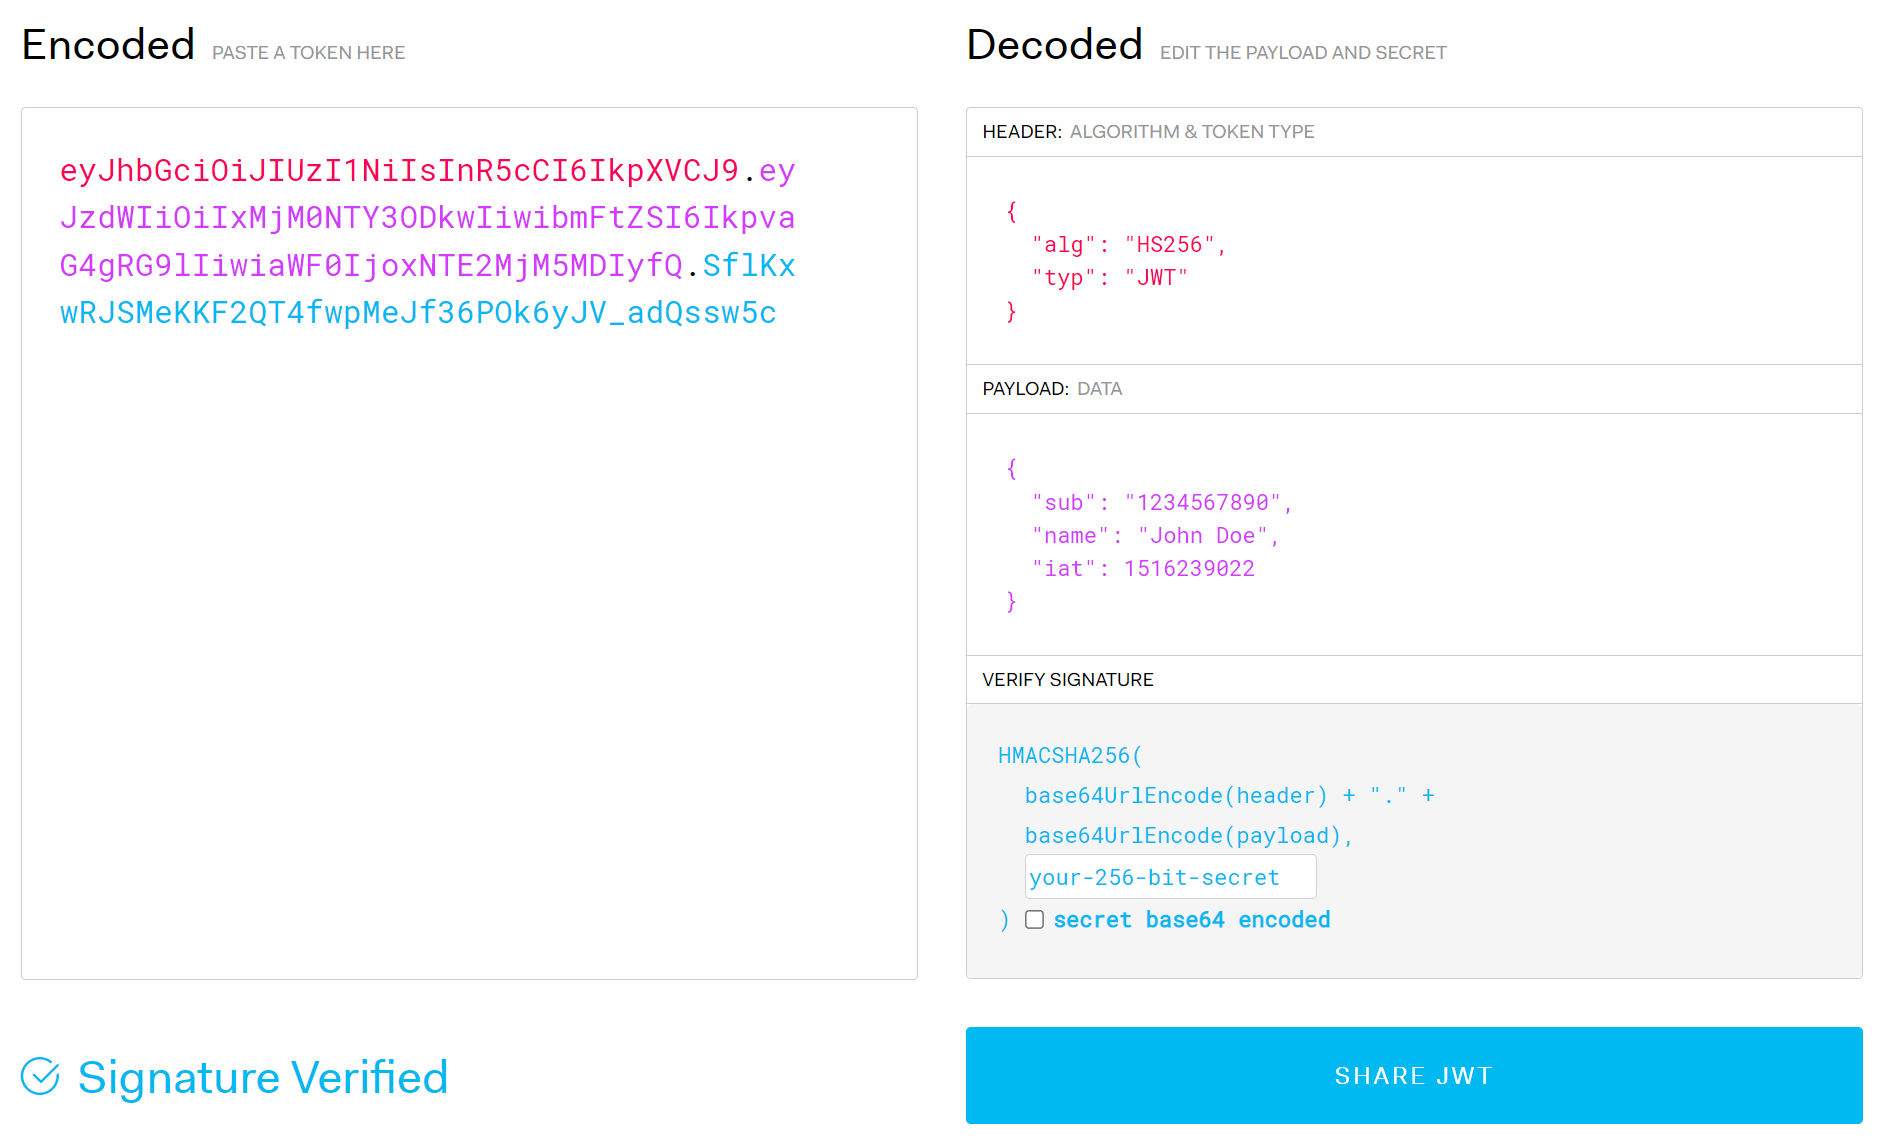
这张图片包含了 JWT 最重要的一些概念。在 Encoded 中,红色和紫色字段是通过 Base64 编码而来,对应 HEADER 和 PAYLOAD 字段,实际上就是明文,任何人都能通过 Base64 解码得到。
而蓝色字段则是通过加密生成的。
Decoded中的字段和含义如下:
// HEADER
{
  "alg": "HS256",	// 使用的算法类型
  "typ": "JWT"		// 类型是 JWT
}
// PAYLOAD 包含很多默认字段
{
  "sub": "1234567890",	// 这个 JWT 颁发给 1234567890 可以理解为用户 ID
  "name": "John Doe",	// 用户的名字
  "iat": 1516239022,	// 颁发的时间
  "exp": 1516239922,	// 过期时间
  "iss": "auth"			// 颁发机构
}
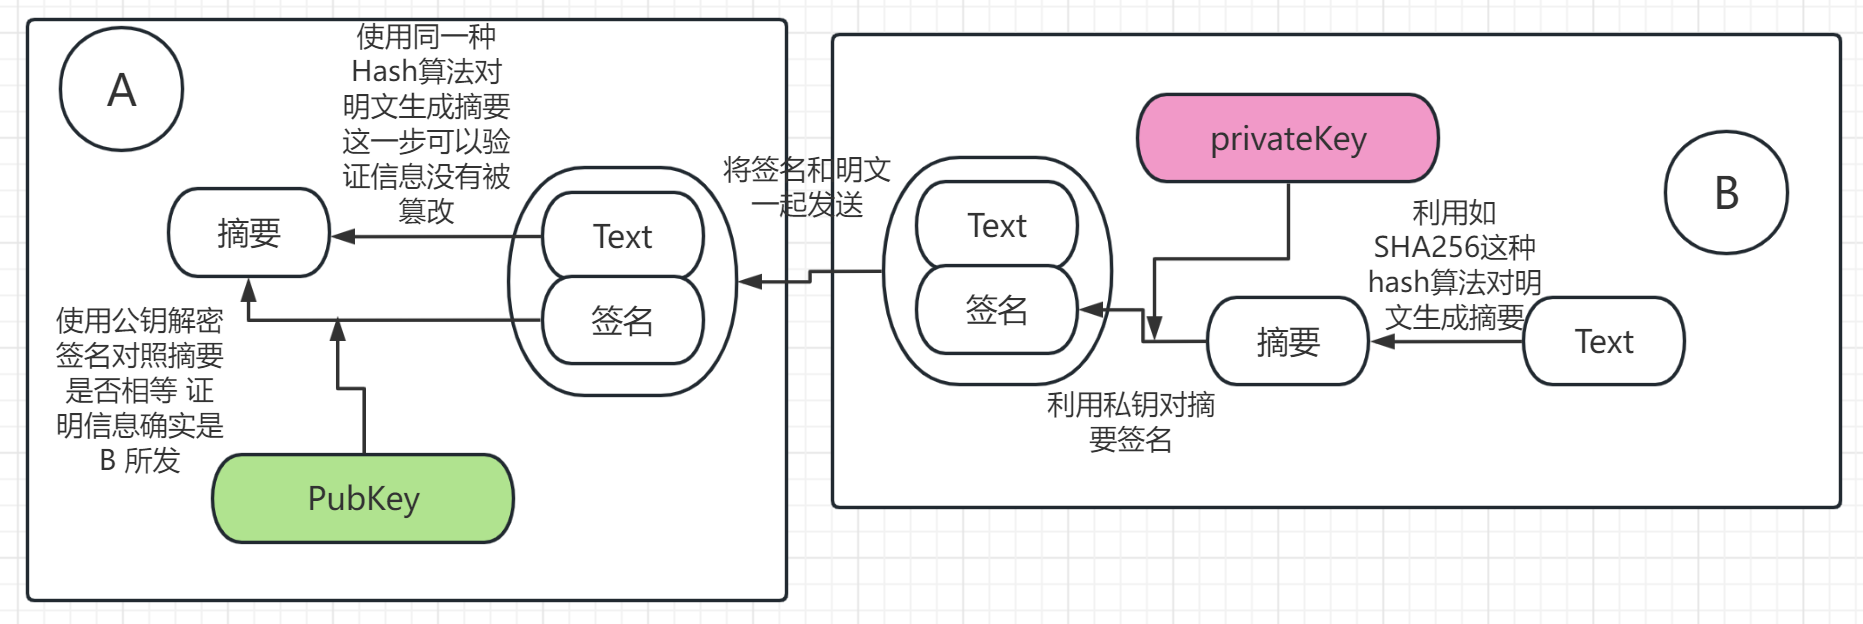
RSA 非对称加密
上文中:
{
  "alg": "HS256",	// 使用的算法类型
  "typ": "JWT"		// 类型是 JWT
}
有个字段表示加密使用的算法,这里我们使用 RSA 非对称加密。加解密过程如下:
- B 将明文使用 Hash 算法运算得到摘要
- 摘要使用 B 的私钥进行签名,也就是加密
- 签名连同明文发给 A
- A 先将明文用同样的 Hash 算法计算摘要
- 再使用 B 的公钥,从签名中解出摘要,也就是解密
- 对比 Hash(明文) 和 解密(签名) 的摘要是否相同
B 的私钥只有 B 自己知道,B 的公钥所有人都能知道。通过签名和验证签名,保证消息确实是 B 所发的,而 Hash 算法则保证明文没有被篡改过。
这里还有一个问题,就是如何证明公钥确实是 B 的公钥,而不是其他人的呢?这就是 CA 的作用了。
通过上述方法,服务器将 JWT 带的信息,如用户ID、用户名、过期时间等信息,从 token 解出来,证明这个 token 确实是自己的服务器所颁发的,并且它的信息也是没有被修改过的。因此,用户身份的安全性就在于有没有保护好自己的 token 不被别人窃取。当然,这种行为存在难度。
Golang 实现 JWT 的 token 颁发和验证
这里我们使用 "github.com/dgrijalva/jwt-go" 这个库来实现,加密方式使用 2048位的 RSA,通过在线的 RSA 公私钥生成网站可以获取公钥文件和私钥文件的 demo。
生成 JWT
package token

import (
	"crypto/rsa"
	"github.com/dgrijalva/jwt-go"
	"time"
)

type JWTTokenGen struct {
	privateKey  *rsa.PrivateKey		// 私钥
	issue       string				// 颁发机构
	nowTimeFunc func() time.Time	// 生成时间
}

func NewJWTTokenGen(issue string, privateKey *rsa.PrivateKey) *JWTTokenGen {
	return &JWTTokenGen{
		privateKey:  privateKey,
		issue:       issue,
		nowTimeFunc: time.Now,		// 颁发时使用当前时间
	}
}

func (j *JWTTokenGen) GenerateToken(accountID string, expire time.Duration) (string, error) {
	nowSec := j.nowTimeFunc().Unix()
    // 使用 NewWithClaims 生成
    // 使用 SHA512 做 hash
	token := jwt.NewWithClaims(jwt.SigningMethodRS512, jwt.StandardClaims{
        // StandardClaims 就对应 jwt.io 中 body 的内容字段
		Issuer:    j.issue,
		IssuedAt:  nowSec,
		ExpiresAt: nowSec + int64(expire.Seconds()),
		Subject:   accountID,
	})
	// 把 token 使用私钥签名后 以字符串形式返回
	return token.SignedString(j.privateKey)
}
上文中 *rsa.PrivateKey 读取方式如下:
// 其中 *rsa.PrivateKey 从 私钥文件中读取
// 使用 jwt.ParseRSAPrivateKeyFromPEM 加载
pkFile, _ := os.Open(*privateKeyFile)
pkBytes, _ := ioutil.ReadAll(pkFile)
privateKey, _ := jwt.ParseRSAPrivateKeyFromPEM(pkBytes)
验证 JWT
验证 JWT 是颁发 JWT 的反过程。
// Package token 验证token 解析 accountID.
package token

import (
	"crypto/rsa"
	"fmt"
	"github.com/dgrijalva/jwt-go"
)

// JWTTokenVerifier 实现 token verify接口.
type JWTTokenVerifier struct {
	PublicKey *rsa.PublicKey
}

// Verify 用自己的公钥去验证 token 是否有效.
func (jwtv *JWTTokenVerifier) Verify(token string) (string, error) {
    // 使用 ParseWithClaims 解出 token 信息 这里就是所谓的 claim
    // 函数签名为 func ParseWithClaims(tokenString string, claims Claims, keyFunc Keyfunc) (*Token, error)
    // 第三个参数作用是获得验签的公钥 这里直接返回公钥
	t, err := jwt.ParseWithClaims(token, &jwt.StandardClaims{}, func(token *jwt.Token) (interface{}, error) {
		return jwtv.PublicKey, nil
	})
	if err != nil {
		return "", fmt.Errorf("cannot parse token: %v\n", err)
	}
    // 如果没有通过验证
	if !t.Valid {
		return "", fmt.Errorf("token not valid\n")
	}
	// 解出其中的 claim 字段并验证
	claim, ok := t.Claims.(*jwt.StandardClaims)
	if !ok {
		return "", fmt.Errorf("token claim is not standard claim\n")
	}

	if err :=claim.Valid(); err != nil {
		return "", fmt.Errorf("claim not valid: %v\n", err)
	}

	// 这里的 claim.Subject 就是构造 token 是填入的 accountID
    // token := jwt.NewWithClaims(jwt.SigningMethodRS512, jwt.StandardClaims{
	//	Issuer:    j.issue,
	//	IssuedAt:  nowSec,
	//	ExpiresAt: nowSec + int64(expire.Seconds()),
	//	Subject:   accountID,
	// })
	return claim.Subject, nil
}
上文中的公钥通过下面方法读取:
// 其中 *rsa.PublicKey 也是通过文件读取 再由 jwt.ParseRSAPublicKeyFromPEM 加载
f, err := os.Open(publicKeyFile)
b, err := ioutil.ReadAll(f)
pubKey, err := jwt.ParseRSAPublicKeyFromPEM(b)
使用 gRPC 拦截器 + Context 机制将验证接入公共逻辑
对于后端所有的服务,我们都需要验证这条请求是否合法,例如:是不是已经登录的用户发起的请求、token有没有过期或者是否正确。这项工作可以统一在 API 的外部入口处进行,在进入内部微服务后,使用包含用户 id 的 context 在不同微服务之前实现请求身份的标识。
默认情况下,从内部入口(如微服务网关)进入的请求没有问题,那么在内部的微服务中就是安全的,因为内部微服务不会向外暴露接口。
引入 gRPC Interceptor
gRPC Interceptor 就理解为 gin 中的 middleware,拦截请求做一些处理之后再放行。
在 NewServer 时会有一些选项:
// func NewServer(opt ...ServerOption) *Server
// 接收一个 ServerOption 列表

// type ServerOption interface {
//	apply(*serverOptions)
// }

// serverOption 是一种实现
// type serverOption struct {
//	grpc.EmptyServerOption
//	apply func(*serverOptions)
}
grpc.NewServer([]grpc.ServerOption...)
而 UnaryInterceptor 返回的 ServerOption 是其中的一种实现,这里我们就用最简单的 UnaryInterceptor 演示:
// func UnaryInterceptor(i UnaryServerInterceptor) ServerOption
// 参数是一个函数 签名如下:
// type UnaryServerInterceptor func(ctx context.Context, req interface{}, info *UnaryServerInfo, handler UnaryHandler) (resp interface{}, err error)
也就是说,我们只需要定义好 UnaryServerInterceptor 这个函数,把它交给 UnaryInterceptor,再把 UnaryInterceptor 交给 ServerOption 列表,最后在 NewServer 时把 ServerOption 列表传入,我们的 gRPC Server 就包含我们自定义的这个拦截器了。
一个验证 token 并转化为 userID 的拦截器
1. 构造 UnaryServerInterceptor
也就是实现这样一个函数:
package auth

import (
	"context"
	"fmt"
	jwt "github.com/dgrijalva/jwt-go"
	"google.golang.org/grpc"
	"google.golang.org/grpc/codes"
	"google.golang.org/grpc/metadata"
	"google.golang.org/grpc/status"
	"io/ioutil"
	"os"
	"strings"
)

const (
	ImpersonateAccountHeader = "impersonate-account-id"
	authorizationHeader = "authorization"
	bearerPrefix = "Bearer "

)

type tokenVerify interface {
	Verify(token string) (string, error)
}

type interceptor struct {
    // 需要一个 tokenVerify 接口的实现
    // 我们之前实现了一个 JWT 的验证器 直接用就行
    // type JWTTokenVerifier struct {
	//	PublicKey *rsa.PublicKey
	// }
	verifier tokenVerify
}

// HandleRequest 作为请求拦截处理器,返回的handler是接下来需要做的处理函数
// 实现 grpc.UnaryServerInterceptor 函数:
// type UnaryServerInterceptor func(ctx context.Context, req interface{}, info *UnaryServerInfo, handler UnaryHandler) (resp interface{}, err error)
func (i *interceptor) HandleRequest(ctx context.Context,
									req interface{},
									info *grpc.UnaryServerInfo,
									handler grpc.UnaryHandler) (resp interface{}, err error)  {
	// 0. 先检查是否加入特殊身份标识
	//    如果有就证明 context 中的 token 已经解出 以 userID 形式在 context 中传递
	//    否则从 token 中解出
	accountID := impersonationFromContext(ctx)
	if accountID != "" {
		return handler(ContextWithAccountID(ctx, id.AccountID(accountID)), req)
	}
	// 1. 在这之前已将token加入context
	//    从最初的context中拿到token
	tkn, err := tokenFromContext(ctx)
	if err != nil {
		return nil, status.Error(codes.Unauthenticated, "")
	}

	// 2. 验证token 拿到 accountID
	accountID, err = i.verifier.Verify(tkn)
	if err != nil {
		return nil, status.Errorf(codes.Unauthenticated, "token not valid: %v", err)
	}

	// 3. 将 accountID 放入 context 中,交给后续的请求执行
	// 	  拦截器捕获 context 取出token
	//    验证 token 获取 accountID
	//	  将 accountID 放进 context
	//	  把新的 context 传下去才真正交给后面的微服务执行
	return handler(ContextWithAccountID(ctx, id.AccountID(accountID)), req)
}

// impersonationFromContext 判断是否需要验证 token 或是 context 中已经验证完
func impersonationFromContext(c context.Context) string {
	m, ok := metadata.FromIncomingContext(c)
	if !ok {
		return ""
	}

	imp := m[ImpersonateAccountHeader]
	if len(imp) == 0 {
		return ""
	}
	return imp[0]
}

// tokenFromContext 从 context 中拿到 token
func tokenFromContext(c context.Context) (string, error) {
	m, ok := metadata.FromIncomingContext(c)	// 查看请求有没有数据
	if !ok {
		return "", status.Error(codes.Unauthenticated, "")
	}

	tkn := ""
	for _, v := range m[authorizationHeader] {
		if strings.HasPrefix(v, bearerPrefix) {
			tkn = v[len(bearerPrefix):]
		}
	}
	if tkn == "" {
		return "", status.Error(codes.Unauthenticated, "")
	}
	return tkn, nil
}

type accountIDKey struct {}

// ContextWithAccountID 将accountID写入context.
func ContextWithAccountID(c context.Context, aid id.AccountID) context.Context {
	return context.WithValue(c, accountIDKey{}, aid)
}
2. 将构造好的 UnaryServerInterceptor 交给 UnaryInterceptor
根据自己的情况实现上文中的 type tokenVerify interface {},并构造出 type interceptor struct {},然后把 UnaryServerInterceptor 交给 UnaryInterceptor 获得 ServerOption:
serverOption := grpc.UnaryInterceptor(interceptor.HandleRequest)
3. gRPC 在 NewServer 时加入拦截器选项
var gRPCOpts []grpc.ServerOption
gRPCOpts = append(gRPCOpts, serverOption)
s := grpc.NewServer(gRPCOpts...)
pb.RegisterServiceServer(s, &Service{})
s.Serve()
加入后注册自己的服务,启动。这样我们的拦截器就加进去了,任何调用这个 gRPC 服务的请求都会经过这个拦截器的验证。